Uploading Image and Video Assets
Now that our Event has been created, we need to upload any required images or videos.
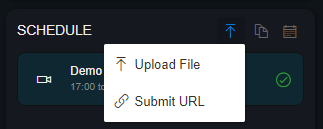
When uploading files there are two options:
Upload File can be used to upload a file directly from your computer. The upload speed is determined via your available upload bandwidth. The upload percentage is displayed at the top right of the Console
Submit URL can be used to ingest a public URL directly into the Push Console. This is a much faster process, but the file must be publicly accessible for Push to be able to retrieve the file
Upload video to the Schedule
If you have a pre-recorded video to play out, this can be added directly to the Schedule.
Press the Schedule upload button:

Submit the video file or URL
The Program Schedule is displayed with the submitted video addedAdjust the Program title and timing if required, then Save Changes
For more detailed information on uploading video to the Schedule, see Program Schedule
Upload Graphics
We can upload images, to be used during playout of the Event, such as:
A full slate to display before the Event, after the Event, or even between Programs
A transparent image with a logo, to display during the entirety of an Event
For information on how to upload and use graphics, read Graphics to understand how to use the available options
Upload Video Media
We can upload a video to be used, for example, as an Intro or Outro to a Program.
Files in the Media Library can also be added to the Schedule as a new Program.
For information on how to upload and use video in the Media Player and Library, see Media Player
Information on uploading files and importing from a URL
For more information on uploading and importing files into the Console, see Uploading Files and Importing from URL
Next: Distributing the Event